- 1). Lift the hood of the Nissan and disconnect the negative battery cable from the negative battery terminal. Use a 10 mm wrench to loosen the bolt that holds the cable's clamp around the lead post. Move the negative battery cable away from the negative terminal.
- 2). Enter the vehicle and pry the upper center dash panel away from the dashboard with a flat screwdriver or trim panel removal tool. The panel contains the vents and the switches for the hazard lights and defroster.
- 3). Pull the power supply wiring from the back of the panel and set the panel aside until re-installation.
- 4). Remove the two screws above the climate control panel with the Phillips screwdriver.
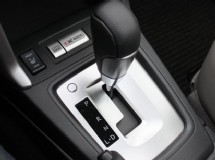
- 5). Pry the trim panel surrounding the gear shift lever away from the center console and remove it from the shifter area. Remove the screw on the left side of the ashtray with the Phillips-head screwdriver.
- 6). Push the ashtray compartment to the left and pull it from the dashboard by hand.
- 7). Remove the two screws at the bottom of the stereo assembly with a Phillips screwdriver.
- 8). Grab the stereo assembly at the bottom of the dash panel and pull it away from the dashboard until the entire stereo and air-conditioner assembly is free of the dashboard. Remove the stereo wiring and black antenna cable from the rear of the radio. Unplug the electrical wiring to the air-conditioning controls.
- 9). Connect the wiring harness adapter to the stereo wiring of the Nissan and place the Nissan diversity adapter (from the installation kit) over the outlet for the antenna.
- 10
Remove the two Phillips screws on each side of the stereo assembly that hold the trim panel to the stereo mounting bracket. Pull the trim panel from the bracket. - 11
Remove the two Phillips screws on each side of the bracket that hold the factory stereo into the bracket. Slide the stock radio from the bracket. - 12
Insert the stereo mounting sleeve from the installation kit and slide the new stereo into the sleeve. Screw in the two screws on either side of the bracket to hold the aftermarket stereo into the bracket. - 13
Replace the plastic trim panel to the front of the stereo/air-conditioner assembly. Replace the screws on each side. - 14
Connect the stereo wiring and FM antenna cable to the rear panel of the new radio. Plug the power cables into the back of the air-conditioner controls. - 15
Slide the entire stereo assembly into the stereo mounting dock in the dashboard of the Maxima. Replace the two screws below the assembly and above it. - 16
Replace the ashtray, push it to the right of its compartment and screw in the screw on the left side of the ashtray. - 17
Place the trim panel around the gear shifter and press it into place by hand. - 18
Connect the power wiring to the back of the upper center dash panel. Place the panel against the dashboard and press it firmly to snap it back to the dashboard. - 19
Return to the engine compartment. Place the negative battery cable clamp around the negative lead post and tighten the clamp to the post using the wrench. Close the hood of the Maxima.
SHARE


